

Painted cabinets are trending! Have you ever thought about painting your kitchen or bathroom cabinets? What a great way to update your home and add value! This project has a HUGE return, you could pay many thousands of dollars to hire this done or do it yourself for less than $200.
We’ll share with you some of our tips and tricks for taking on this painted cabinet project and show you how to get a finish that will endure! Be sure to scroll all the way to the bottom for some AMAZING transformations. We have some affiliate links below where we earn a small commission for their sale. Our promise to you is that we’ll never recommend a product we don’t know and love!
You’re about to see a lot of words, if you’re a visual learner check out this video!
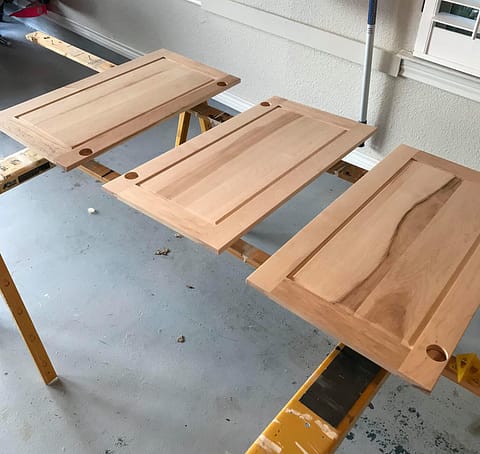
Prep Work
First take the doors off their hinges, while you do that, number each door so you know where it belongs when you’re ready to re-install. We use a sharpie and mark the door where the hinge will cover. (Don’t try to paint the doors while on their hinges, you won’t be happy with the result.) I love this little Black & Decker (https://amzn.to/2ri6Qc1) cordless screw driver, it’s been worth every bit of its tiny price. We’ve had it for years and use it all the time!
Next, Clean, Clean, Clean! This really is the most important and the most labor intensive step. Start off cleaning the cabinets with soapy water (is there any grease that Dawn dish soap can’t remove?) and a little scrubby. Then spray on Crud Cutter Pre Paint Cleaner (https://amzn.to/342xcvN) and give them another scrubbing. This hard work will really make your finish last a lot longer.
Sanding – Start off with a liquid deglosser (https://amzn.to/2P5hZpw). Just wipe it on with a paper towel. Then let the cabinets dry. Once they’re dry, go over them with a fine grit sandpaper, buffing out any remaining shiny areas. It’s not necessary to sand the doors down to the wood. We just want your cabinets clean and not too shiny. Once the sanding is finished, wipe off the doors with a damp towel to remove the dust.
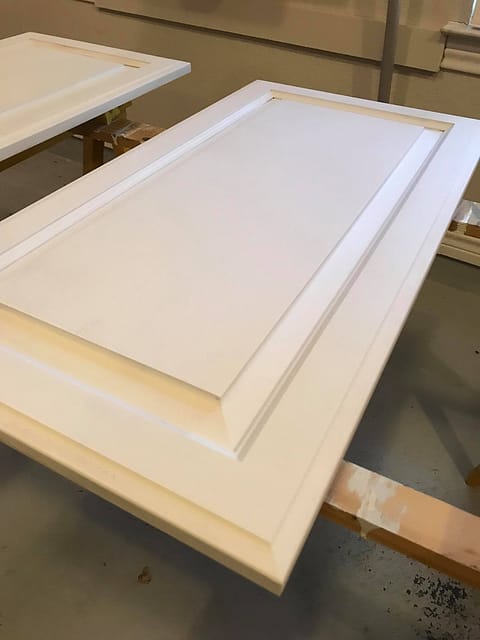
Priming
Next, we’ll set up for priming and painting. We really love these painters pyramids (https://amzn.to/2YyztgZ), they have a little tab where you can screw them to a board (like a 6’ long 1”x3”), set two of these boards with the painters pyramids attached onto a set of saw horses (https://amzn.to/2LDgMDQ). Now you’ve got a perfect painting station!
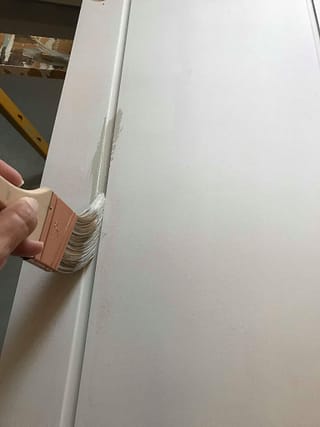
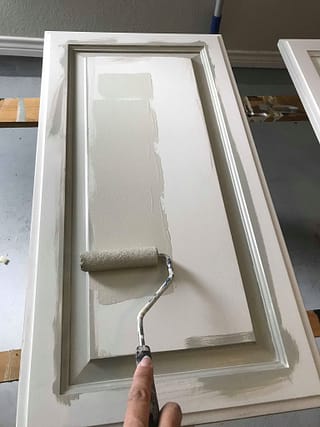
Finally, the hardest steps are behind us, now comes the fun stuff!! We don’t have a strong opinion on what brand primer you use. We usually pick up the primer when we get the paint. The paint store will help you tint the primer, if needed. Start with your cabinet door top down onto your pyramids, then use a paint bush (https://amzn.to/33ZLahT) to apply the primer on the frame details. In the open, flat areas, roll on the primer (with this roller) in a thin coat.
Once you’ve primed the back of the door, carefully roll primer along the edges of the door, we find that primer and paint can build up around these edges so try to use light coats. We also recommend that once you’ve finished a side, look it over to see if you’re getting any pooling of the primer/paint (especially in the corners) and brush those areas smooth. Then you can flip the door over and paint the front of the door using the same steps. We will typically prime all of our door backs and then flip them to do the fonts. This will give the primer a little time to dry.

Let your doors sit for about a day. Once dry, we always see if the primer passes the “scratch test” this is where we use our fingernail (good-bye mani) and scratch hard against the primed door, you shouldn’t be able to get any of the primer off, if you do, usually they just need extra time for the primer to harden.
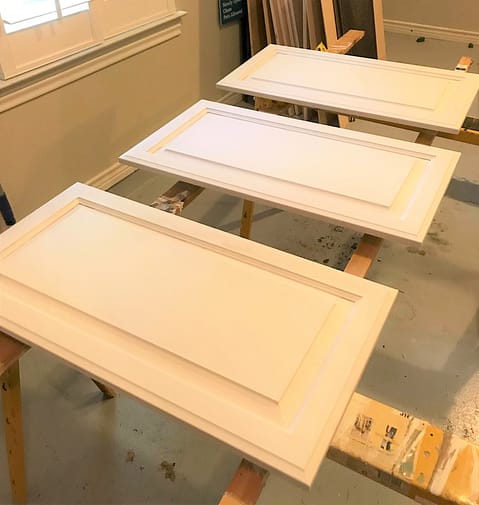

Painting
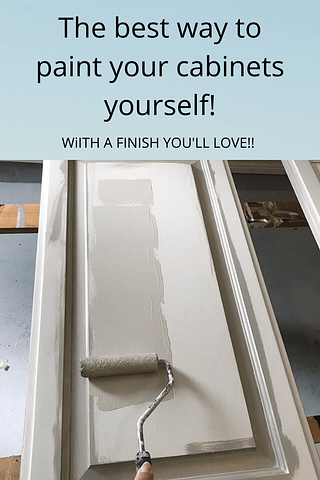
By now we’re starting to see some progress! The only paint we really recommend for heavily used cabinets is Benjamin Moore’s Advance. It’s formulated for just this type of project and we’ve found to be the best finish for the DIYer like you and I. It’s very durable, we’ve had it on our cabinets for a few years now and they’ve held up great. This paint is water-based which is nice for easy clean up. The best thing about this paint is that it’s self leveling, which means that your brush and roller strokes just melt away!
Apply the paint using the same steps used for the primer, start with the backs of the doors using your brush and roller, give them a check and then flip them and paint the fronts. This paint does have a longer drying time, let them dry for a solid day before putting on your second coat (2 coats work best for us). The paint will fully cure over the next couple of months. Once the doors and drawers are painted, I like to wait a couple of days before installing them and just be a little extra careful the first few weeks.


Drawers and Bases
Drawers – if you can, take the fronts off of your drawers, sometimes you’ll find that they’re screwed in and can be removed. Removing the fronts makes things a little easier but if you remove them, just tape off the areas that shouldn’t be painted.
Cabinet bases – For the bases of your cabinets, it’s really the same steps above with a few precautions. Since the bases are a vertical surface is very important to use thin coats, if applied too thick the paint will run slightly, this is called “sag.” Be sure to tape off your floor and also your shelves to avoid getting paint on those area. We recommend painting the inside of your cabinet frames, that’s just the ¾” edge that runs along cabinet opening and the underside of your upper cabinets.
Final Thoughts
We hope you love your new painted cabinets, a high five to you for tackling this project! We love our painted cabinets and our only regret is that we didn’t do it sooner! A few final tips we wanted to pass along:
- The garage is a great spot to paint your doors, we like to have the garage doors down/closed, so dust and bugs don’t fly in and land on your nicely painted doors.
- No sealer is needed or recommended when using Benjamin Moore Advance.
- Once you’ve primed or painted a section, it’s important to look it over carefully to make sure you’re not getting any pooling of the paint or primer. This can happen easily in the corners, brush those areas to clear out a build up before they dry.
- We recommend two coats of primer for white painted cabinets
- Our personal preference is the Satin sheen of paint
- Put bumpers on your doors and drawers after you install them, we like these (https://amzn.to/2P3sb1D).
- If your hinges are the style that have a little cup drilled into the door, avoid getting paint in that cup to avoid trouble in putting the hinges back on.
- You can seal your brush and roller in a ziplock bag to keep them fresh for the next day. Use a fresh roller when switching from primer to paint.
- If you’re painting a lot of cabinets, like for your kitchen, break the projects into sections so that it’s not so overwhelming. For example, week 1 paint the bottom cabinets on one side, then week 2 the top cabinets. It may take a little longer but we find that we’re less likely to get lax on a step if we focus on smaller sections.
- We’ve created an article on installing hardware or changing the location of the holes for pulls, that information can be found here.
Good luck and send us your before and afters! xxoo
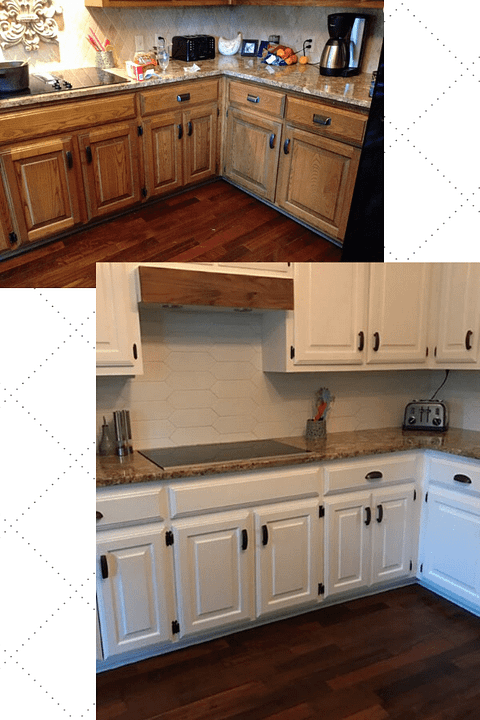
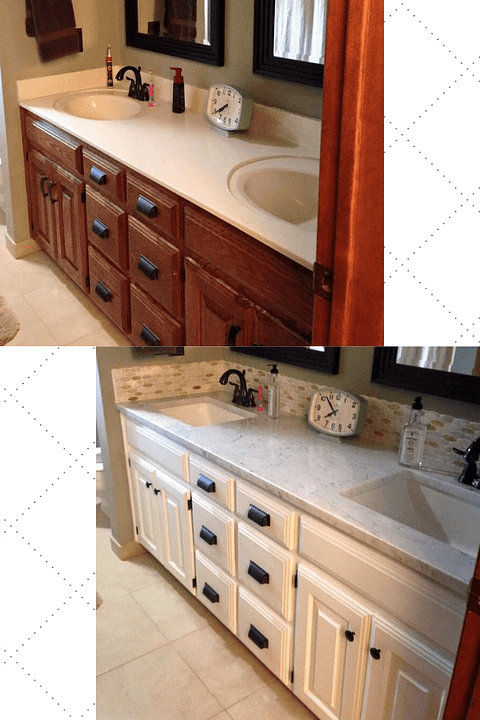
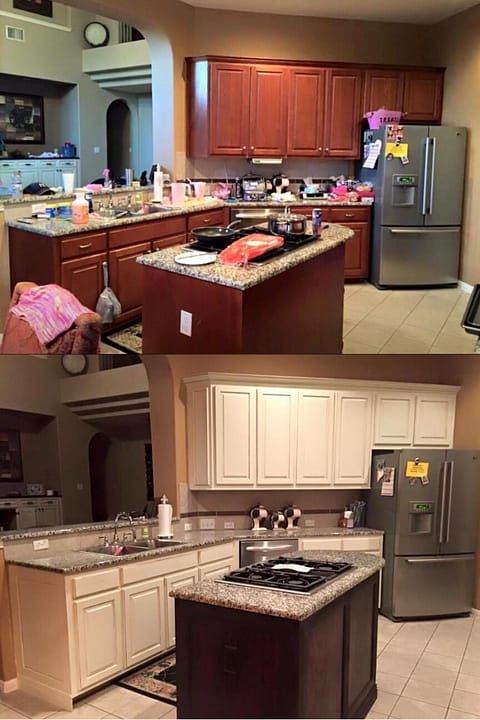
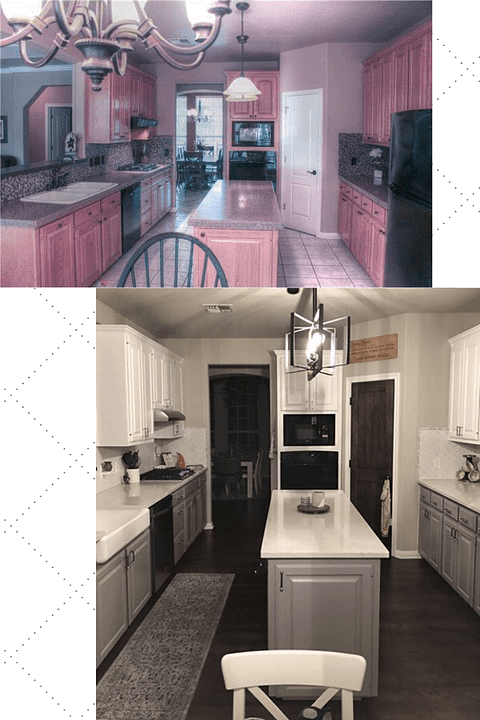
Painted Cabinets – Before and After
We love a good before and after shot, here area photos of some of our favorite before and after painted cabinets.


The legal stuff: This article reflects our opinions and experience and in no way provides a guarantee of your final result.
Dakota Dixies is a participant in the Amazon Services LLC Associates Program, an affiliate advertising program designed to provide a means for sites to earn advertising fees by advertising and linking to amazon.com. You can see all our details on our Privacy Page.


The link for the roller you use, is not available.
Thank you so much for letting us know! We’ve got that link updated now. Happy painting!
Thank you, I’m not finding the link.
oops found it